
Managing file formats
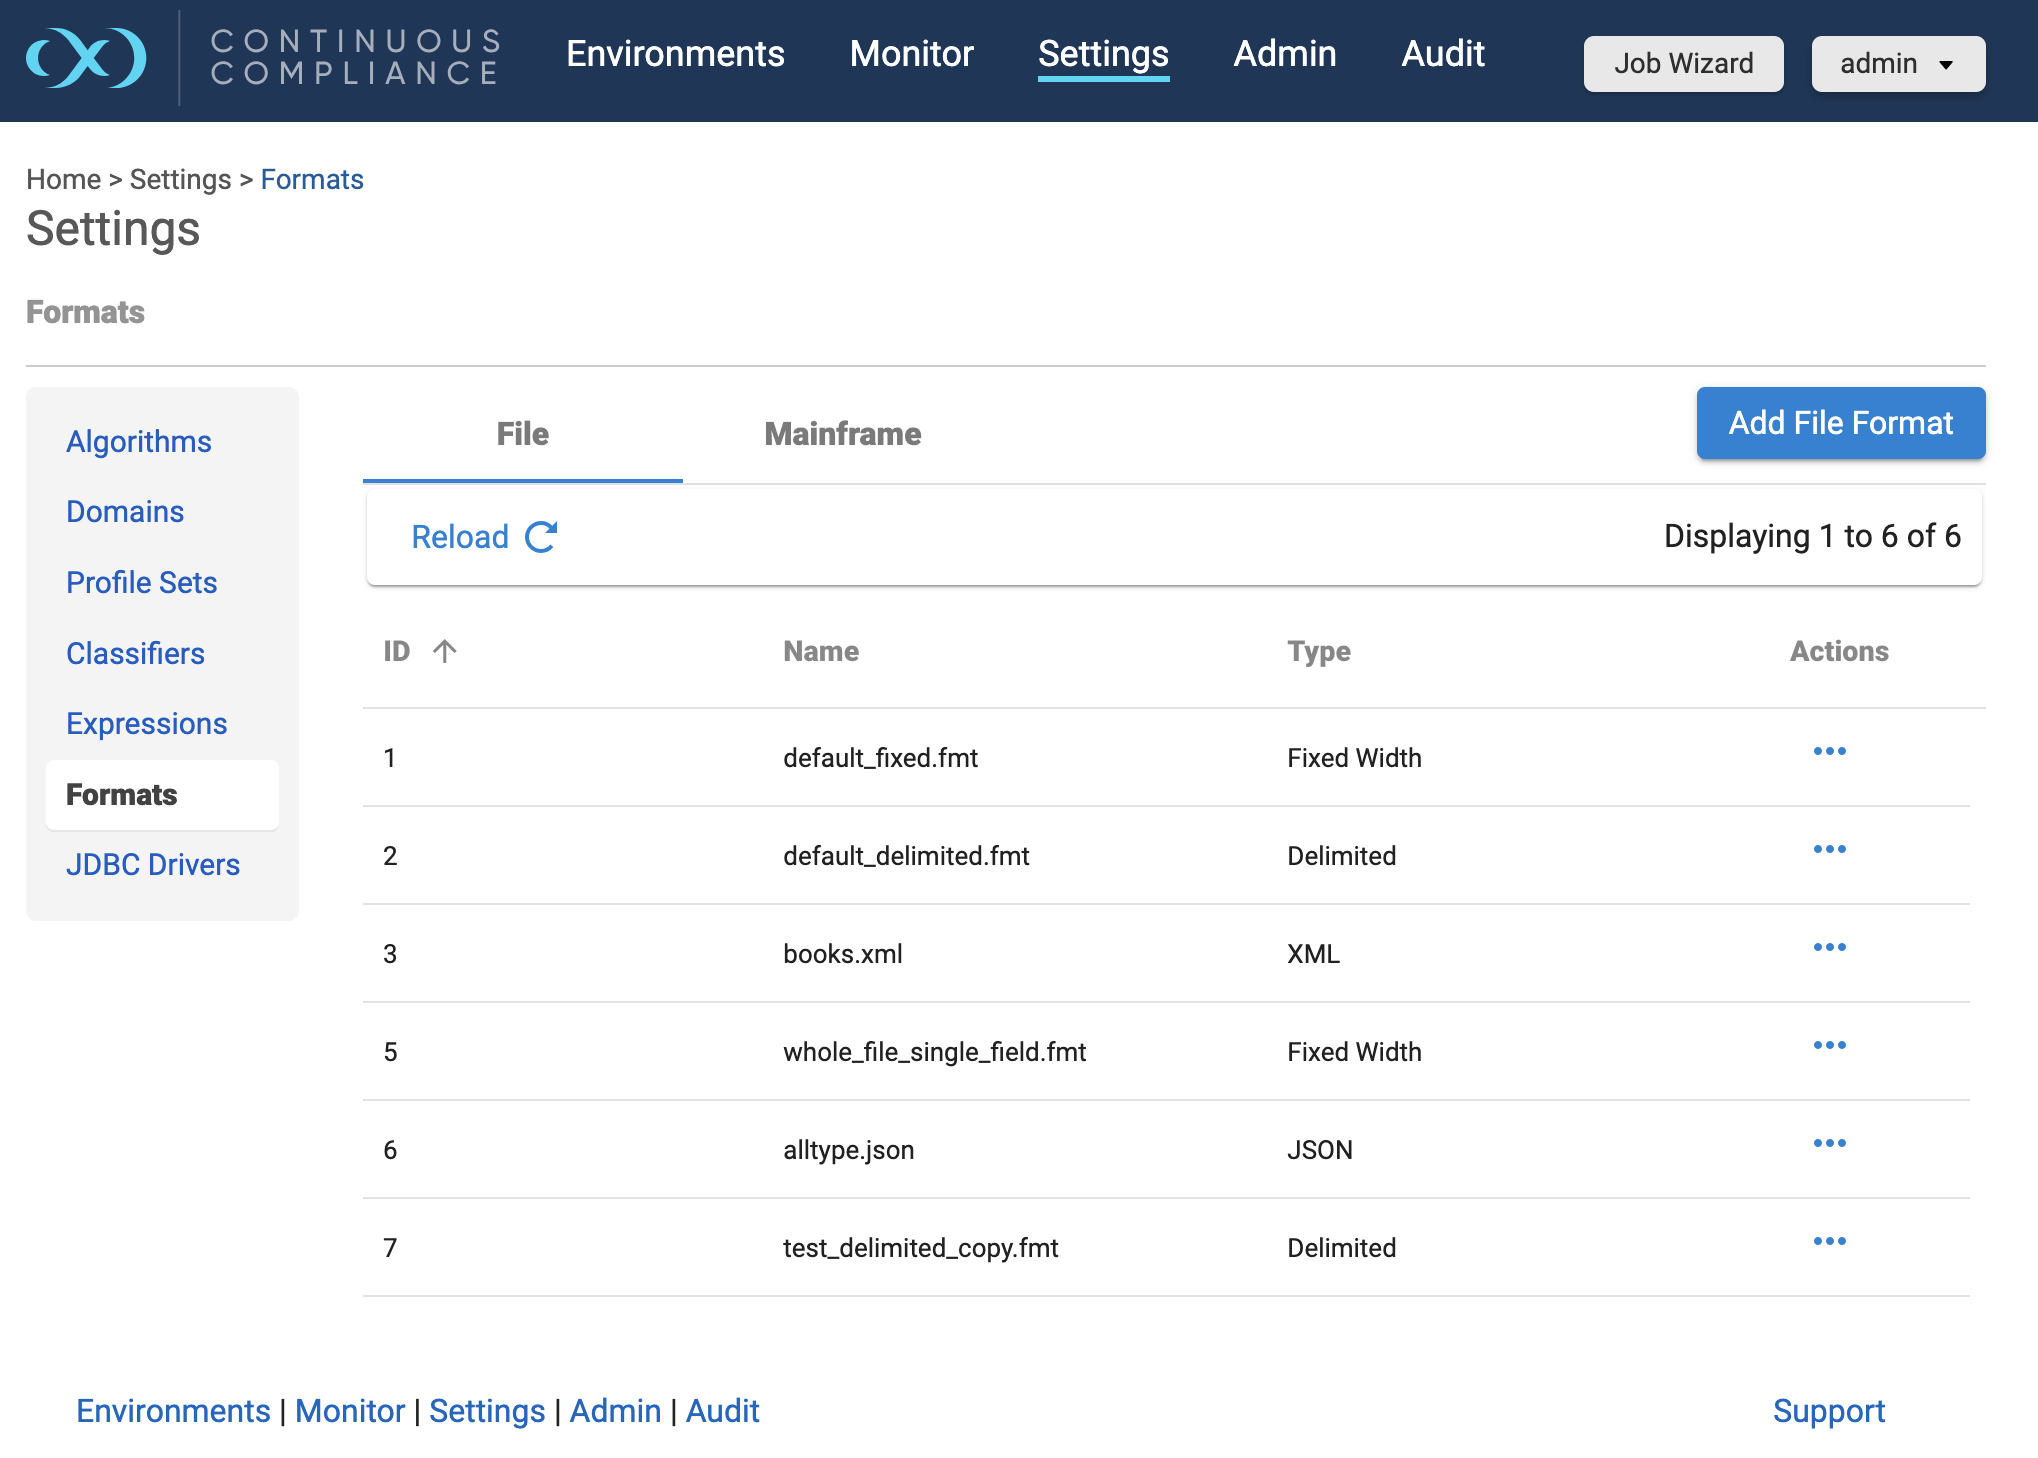
Unlike databases, files typically do not have built-in metadata to describe the format of the fields in the file. Therefore this information must be provided to Delphix. This is done through the Settings tab, where a menu item is available on the left for Formats. Click on Formats to see tabs for File and Mainframe and a button to add a format.
Construct a Delimited File Format to upload
To import the file format for a delimited file, create a text document with the field names listed one per line describing the structure of the file to Delphix. The screenshot below shows the contents of an example delimited file format.
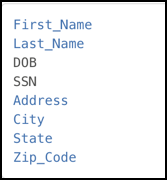
Notice there is no header and only a list of values.
Delimited file mismatch between format and data
Suppose the following delimited file format is being used
Delimited File Format:
CODEFieldOne FiledTwo FiledThreeDelimiter Character:
,
If the input data does not match the format:
Input Field Count < Format Field Count: after masking, delimiters will be appended to match the total fields with file format. For example:
Input data: Data1, Data2
Result after masking: Masked1, Masked2,
NOTE: One extra delimiter is added to match with the file format
Data Field Count > Format Field Count: after masking the extra fields in the delimited file will be lost. For example:
Input data: Data1, Data2, Data3, Data4
Result after masking: Masked1, Masked2, Masked3
Construct a Fixed-width File Format to upload
For fixed-width files, import a text file that describes the structure of the file to Delphix.
To input the file format for fixed-width files, create a text document with the field names and the length of each field, one combination per line. The screenshot below shows an example of content for fixed-width formats. In this format, the field name is followed by the length of the field, separated by a comma.
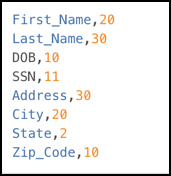
Notice there is no header and only a list of values.
Fixed-width file mismatch between format and data
For fixed-width files, caution should be taken to ensure that the field length is accurate. An incorrect field length will result in masking a field with the incorrect offset, which would have the unintended consequence of not masking what was intended.
Multi-byte characters For fixed-width files, field length is determined by the number of characters rather than the number of bytes.
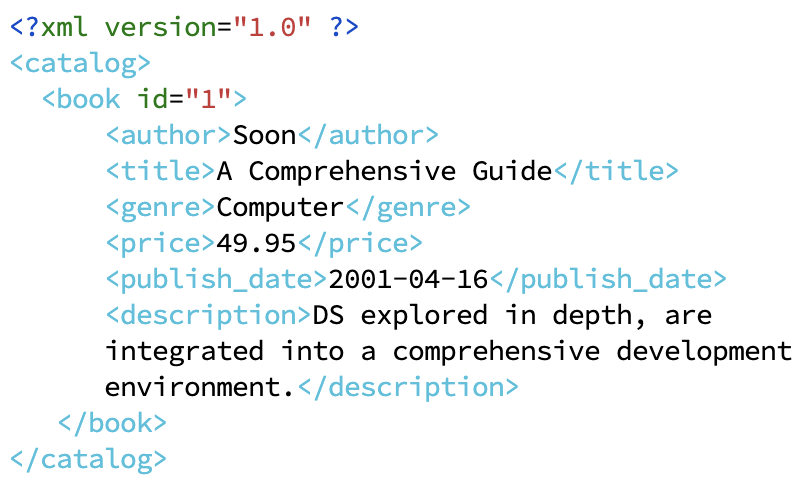
Construct XML File Format to upload
For XML format files you can use the data file itself or a subset of the file you want to mask as the format.
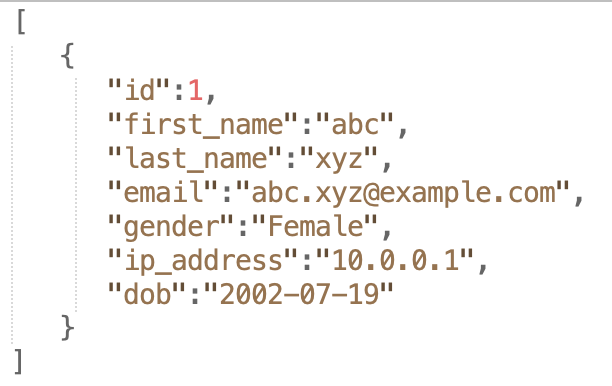
Construct JSON File Format to upload
For JSON format file you can use the data file itself or a subset of the file you want to mask as the format.
Mainframe data set to upload
For Mainframe files, you can use the copybook file as the format.
To import a File format
For all File types other than Mainframe, you can import the file format via the Add File Format button in the File tab, which will import the file directly into Delphix.
Click the Add File Format button at the upper right. The Add File Format wizard appears.
Select a Format Type. click Next.

Formatting Examples are shown in the wizard based for each format type.
Import a format by clicking Choose File. The name of the file will be the name of the file format.
Browse for the file from which the fields will be imported. Click Next.
Note: The contents of the imported file vary for delimited, fixed width, copybook (Mainframe), XML, and JSON file types.
Removing a selected file
If you accidentally selected an incorrect file, simply click the cross button to the right of the file name and repeat the selection steps above.
Optionally, for only the delimited or fixed-width formats, users will see a step to configure the number of header or footer records for the file. Click Next with or without setting the header or footer as needed.

View the summary on the last step to review the changes.
Click Save at any point after importing the format.
To import a Mainframe format
For Mainframe data sets, you can specify the format via the Add Mainframe Format wizard in the Mainframe tab, which will import the copybook directly into Delphix.
Go to the Mainframe tab.
Click the Add Mainframe Format button in the upper right. The Add Mainframe Format wizard will appear.

The Copybook Format Type is pre-selected. click Next.

Formatting Examples is shown in the wizard for copybook.
Import a format by clicking Choose File.
Browse for the format file and click Next.

Removing a selected file
If you accidentally selected an incorrect file, simply click the x button to the right of the file name and repeat the selection steps above.
View the summary on the last step to review the changes.
Click Save at any point after importing the format.
To delete a format
Click the Actions button (…) to the right of the corresponding format name in the list and select the Delete option from the dropdown.
The user will be prompted for confirmation.
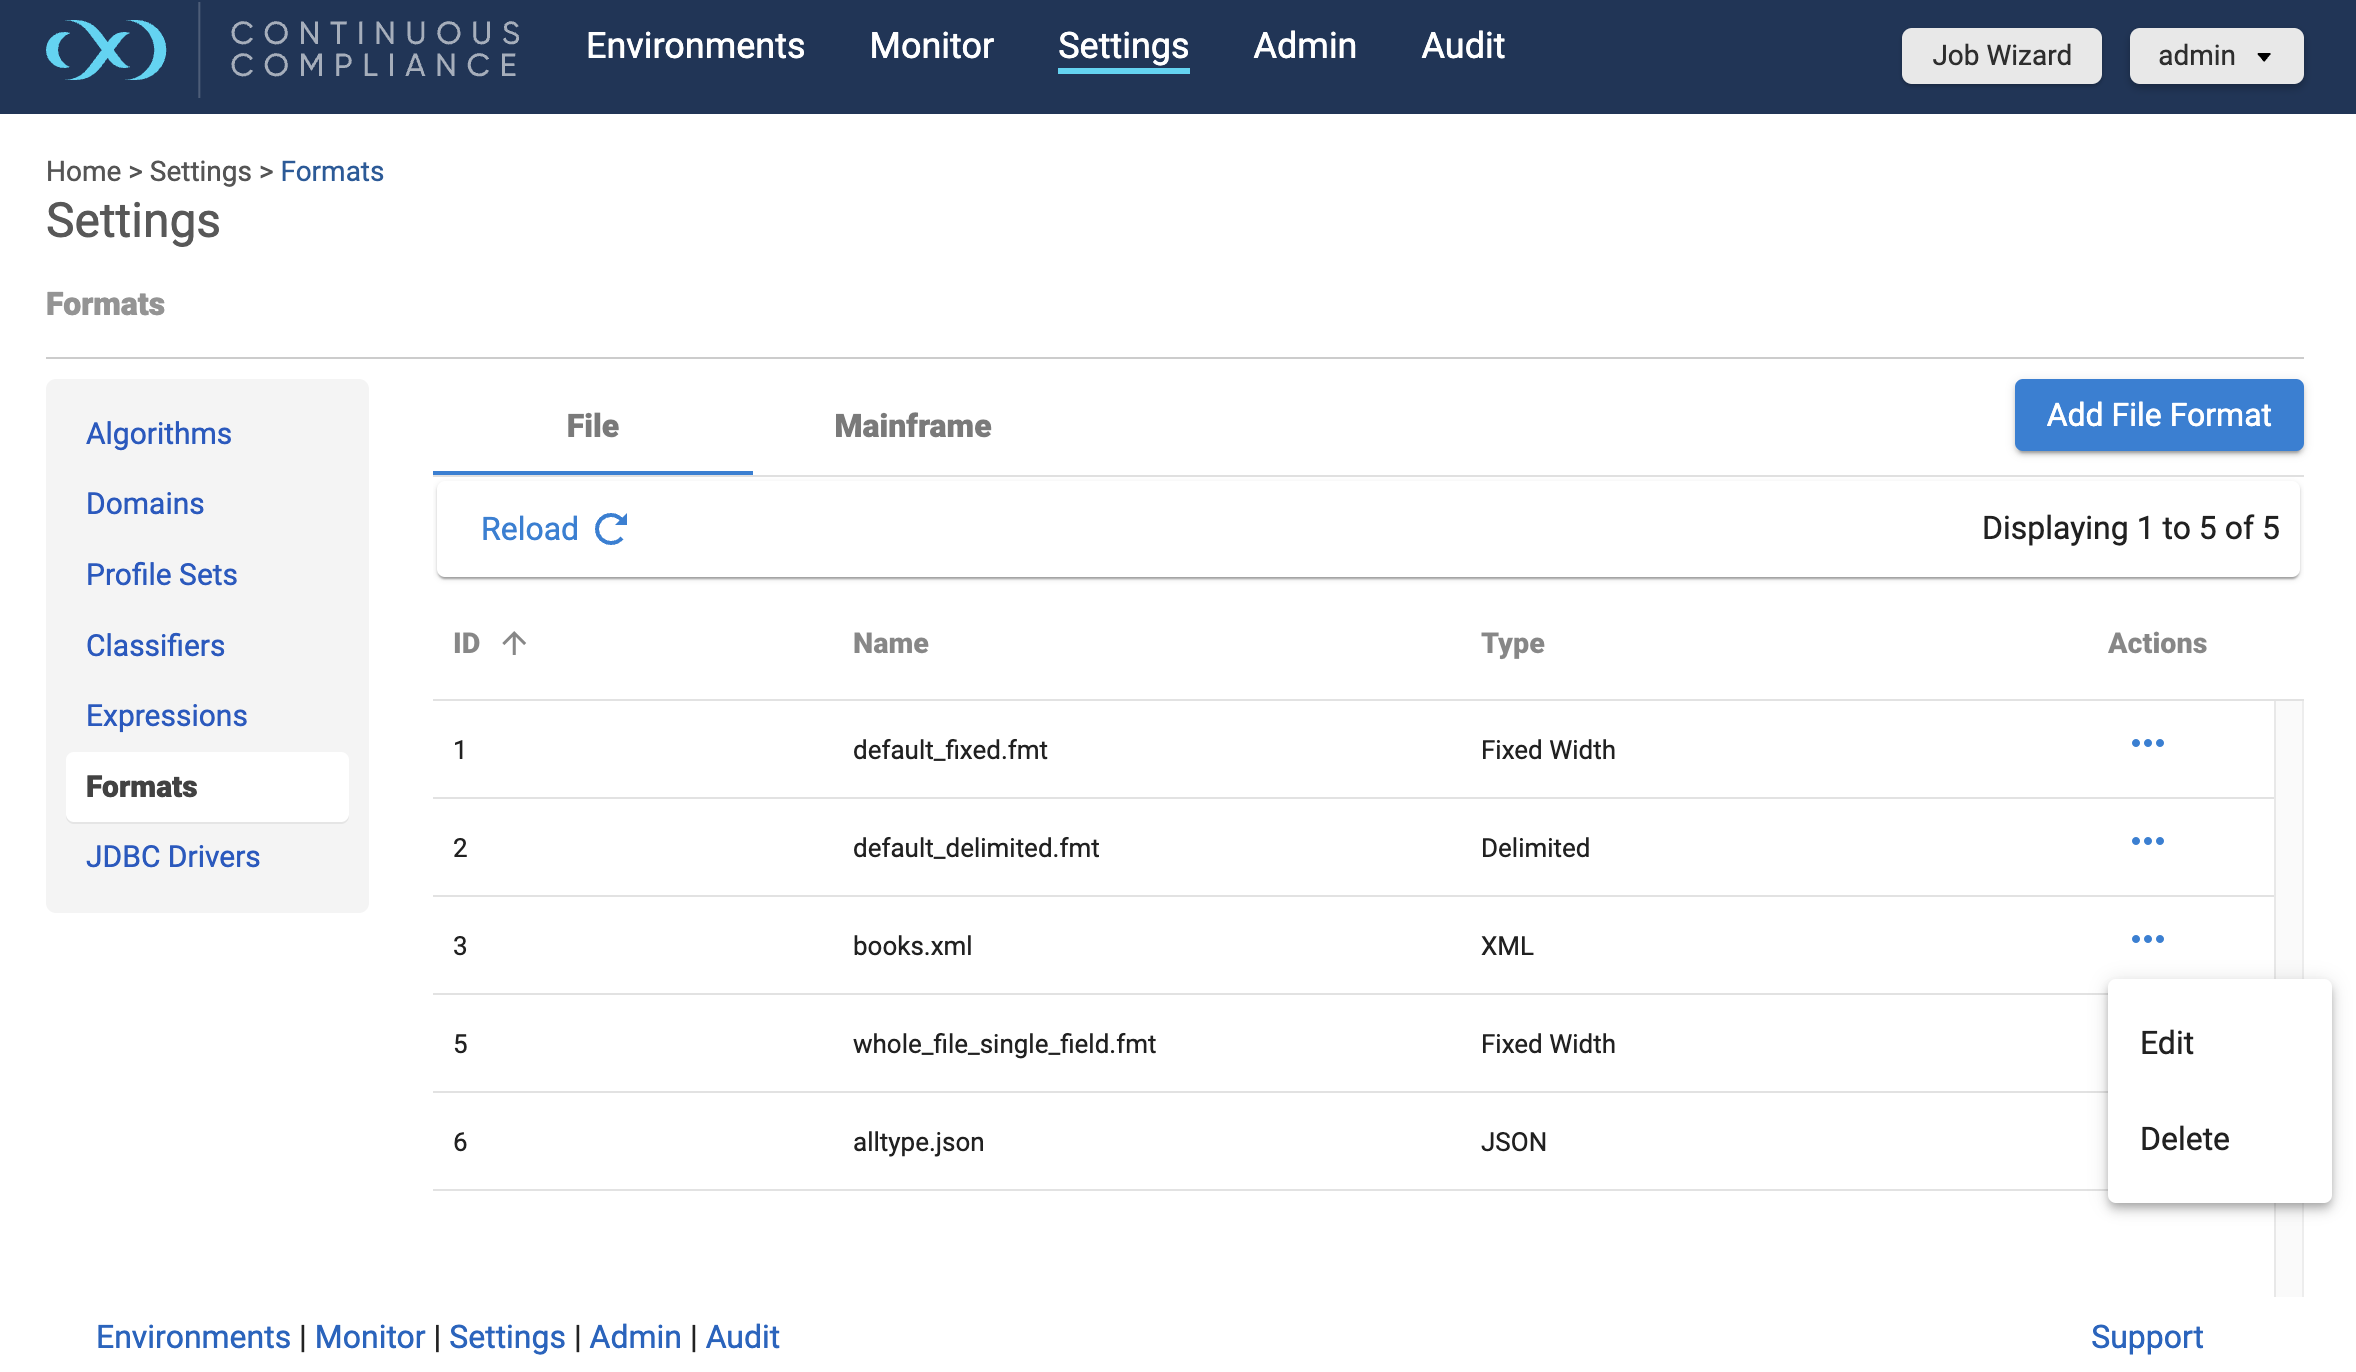
To edit a format
Click the Actions button (…) to the right of the corresponding format name in the list and select the Edit option from the dropdown.
File inventory is based on the file format. Therefore, if you make a change to a file inventory, that change applies to all files that use that format.
Assigning a file format to files
Once a rule set with a file or set of files is created, you will need to assign those files to their appropriate file format. This is accomplished by editing the rule set. When clicking on the edit button for the file, a pop-up screen called Edit File will appear with the file name. There will be a drop-down to select the proper format for the file. If the file is a Mainframe data set file with a copybook, you will see a checkbox to signify if the file is variable length.
For all other file types, select the end-of-record to let Delphix know whether the file is in Windows/DOS format (CR+LF) or Linux format (LF). If the file is a delimited file, there will be a space to put in the delimiter. If there are multiple files in the ruleset, you will have to edit each one individually and assign it to the appropriate file format.
Add Fields to a file format
You can define new fields only on Delimited, Fixed-Width & JSON file formats.
To create new fields:
Go to Settings -> Format page, from the Actions (..) the dropdown to the right of the corresponding format name, and choose the Edit option, An inventory-like screen will be visible with all the fields listed.
You can also navigate to this Formats screen from any Environments Inventory tab, by clicking on the Edit File Format button.
An information banner is also added on the inventory page to help user with navigation.

Click on the Add Field button appearing on the left corner just above the grid, to open an Add Field Dialogue.
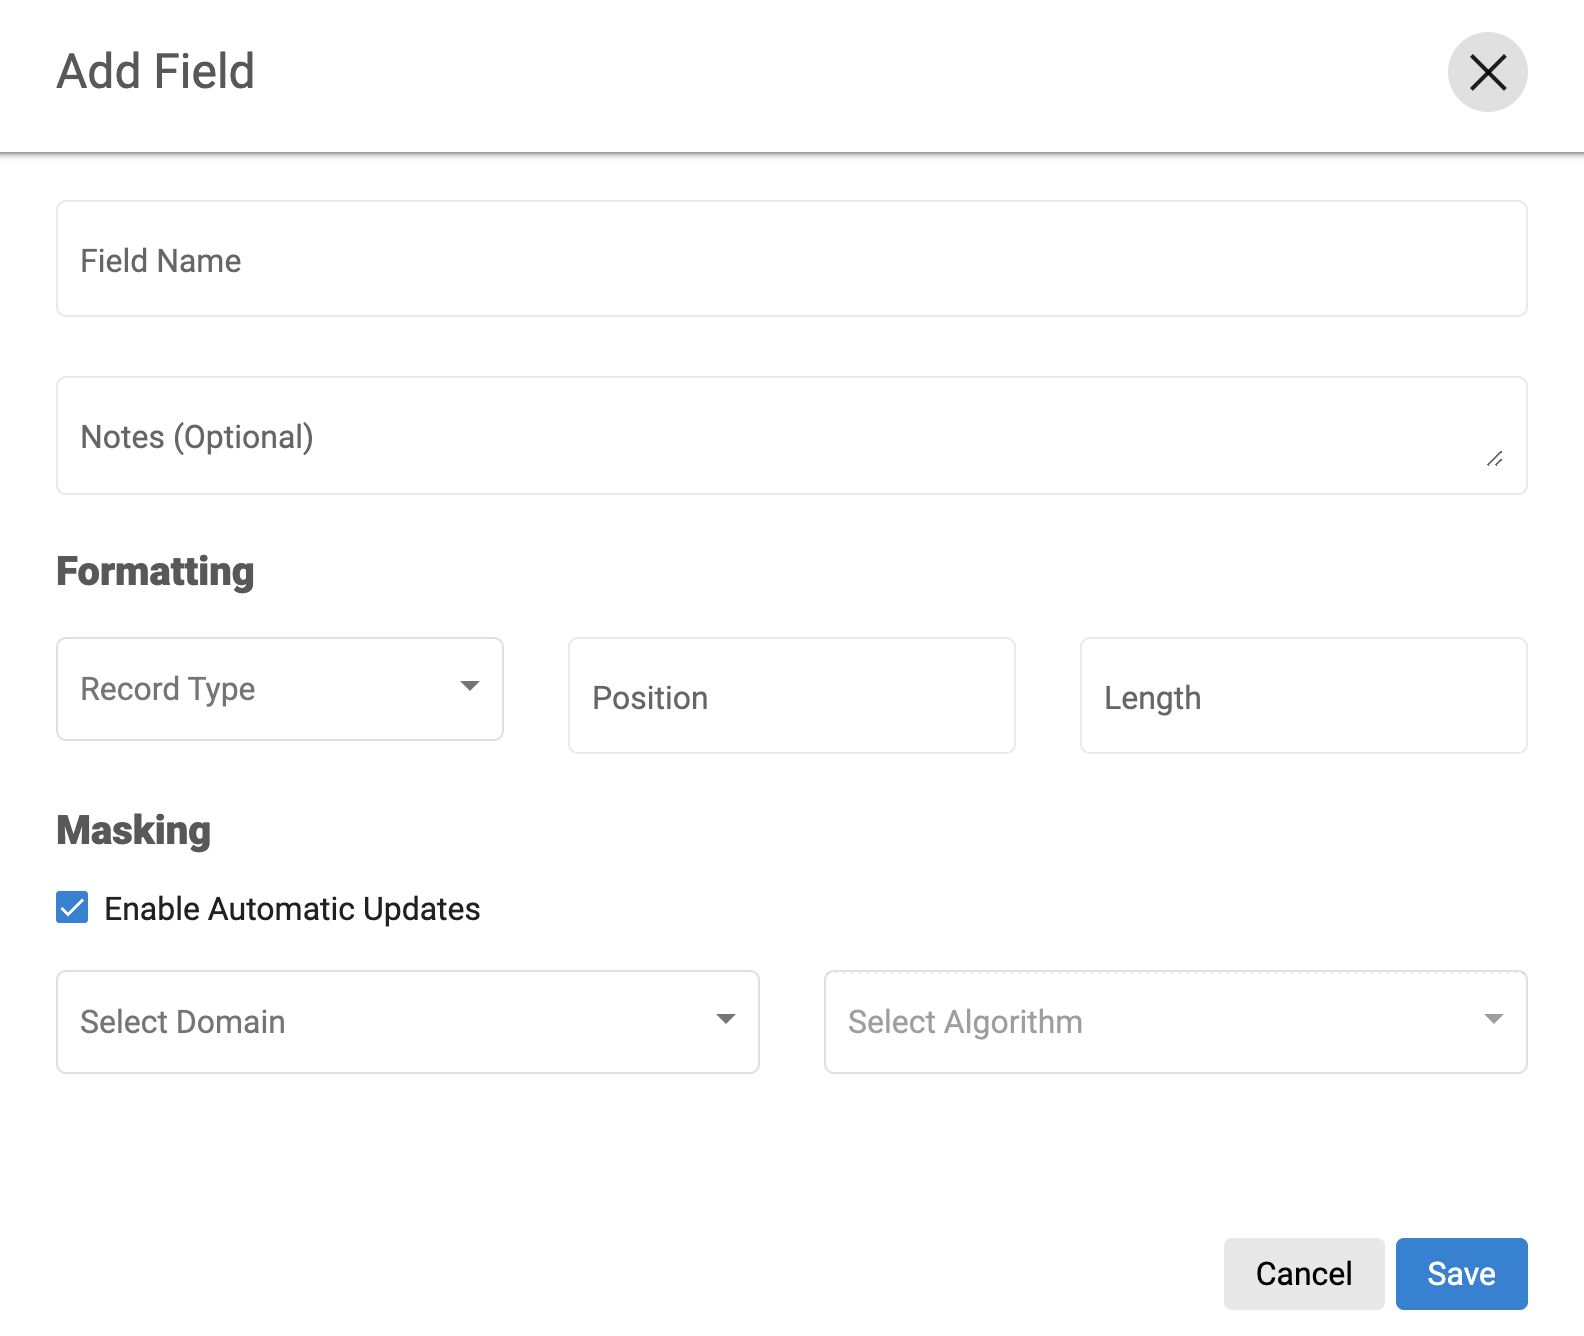
If you select a DATESHIFT algorithm or multi-column algorithms, more fields will appear in the dialogue. A DATESHIFT algorithm allows you to pick a date format from the dropdown list or specify your own date format.
Fill out the form and click Save.
The Field Name or JSON Path and all inputs in the Formatting section are mandatory.
The Masking section is optional and can be edited later as well.
Newly added fields will be reflected under the selected record type group on the page.
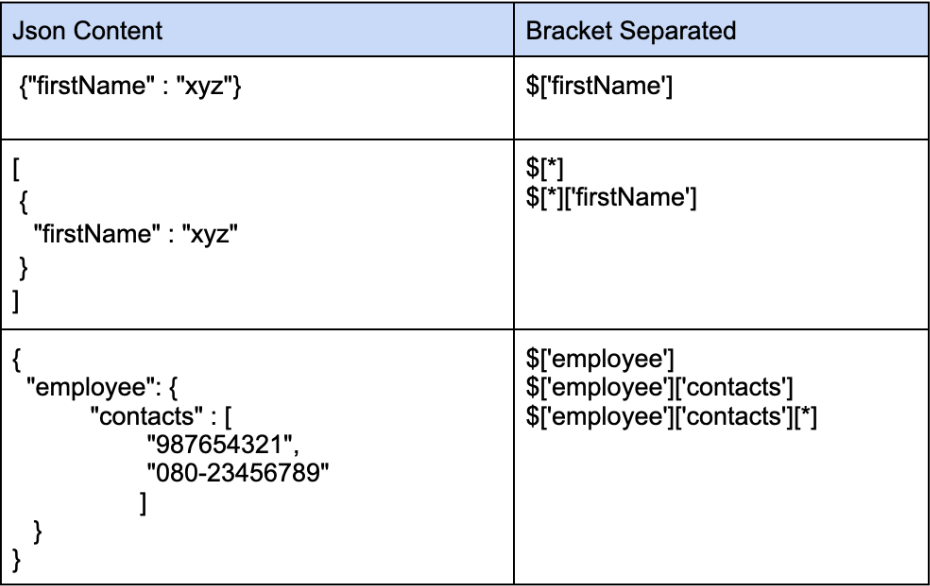
Constructing a JSON path
A JsonPath expression begins with the dollar sign ($) character, which refers to the root element. The dollar sign is followed by a sequence of child elements, which are separated by the square brackets ([‘’]) containing the name of each JSON field. If the field is inside an array, a star character is used to represent all elements of the array ([*]).
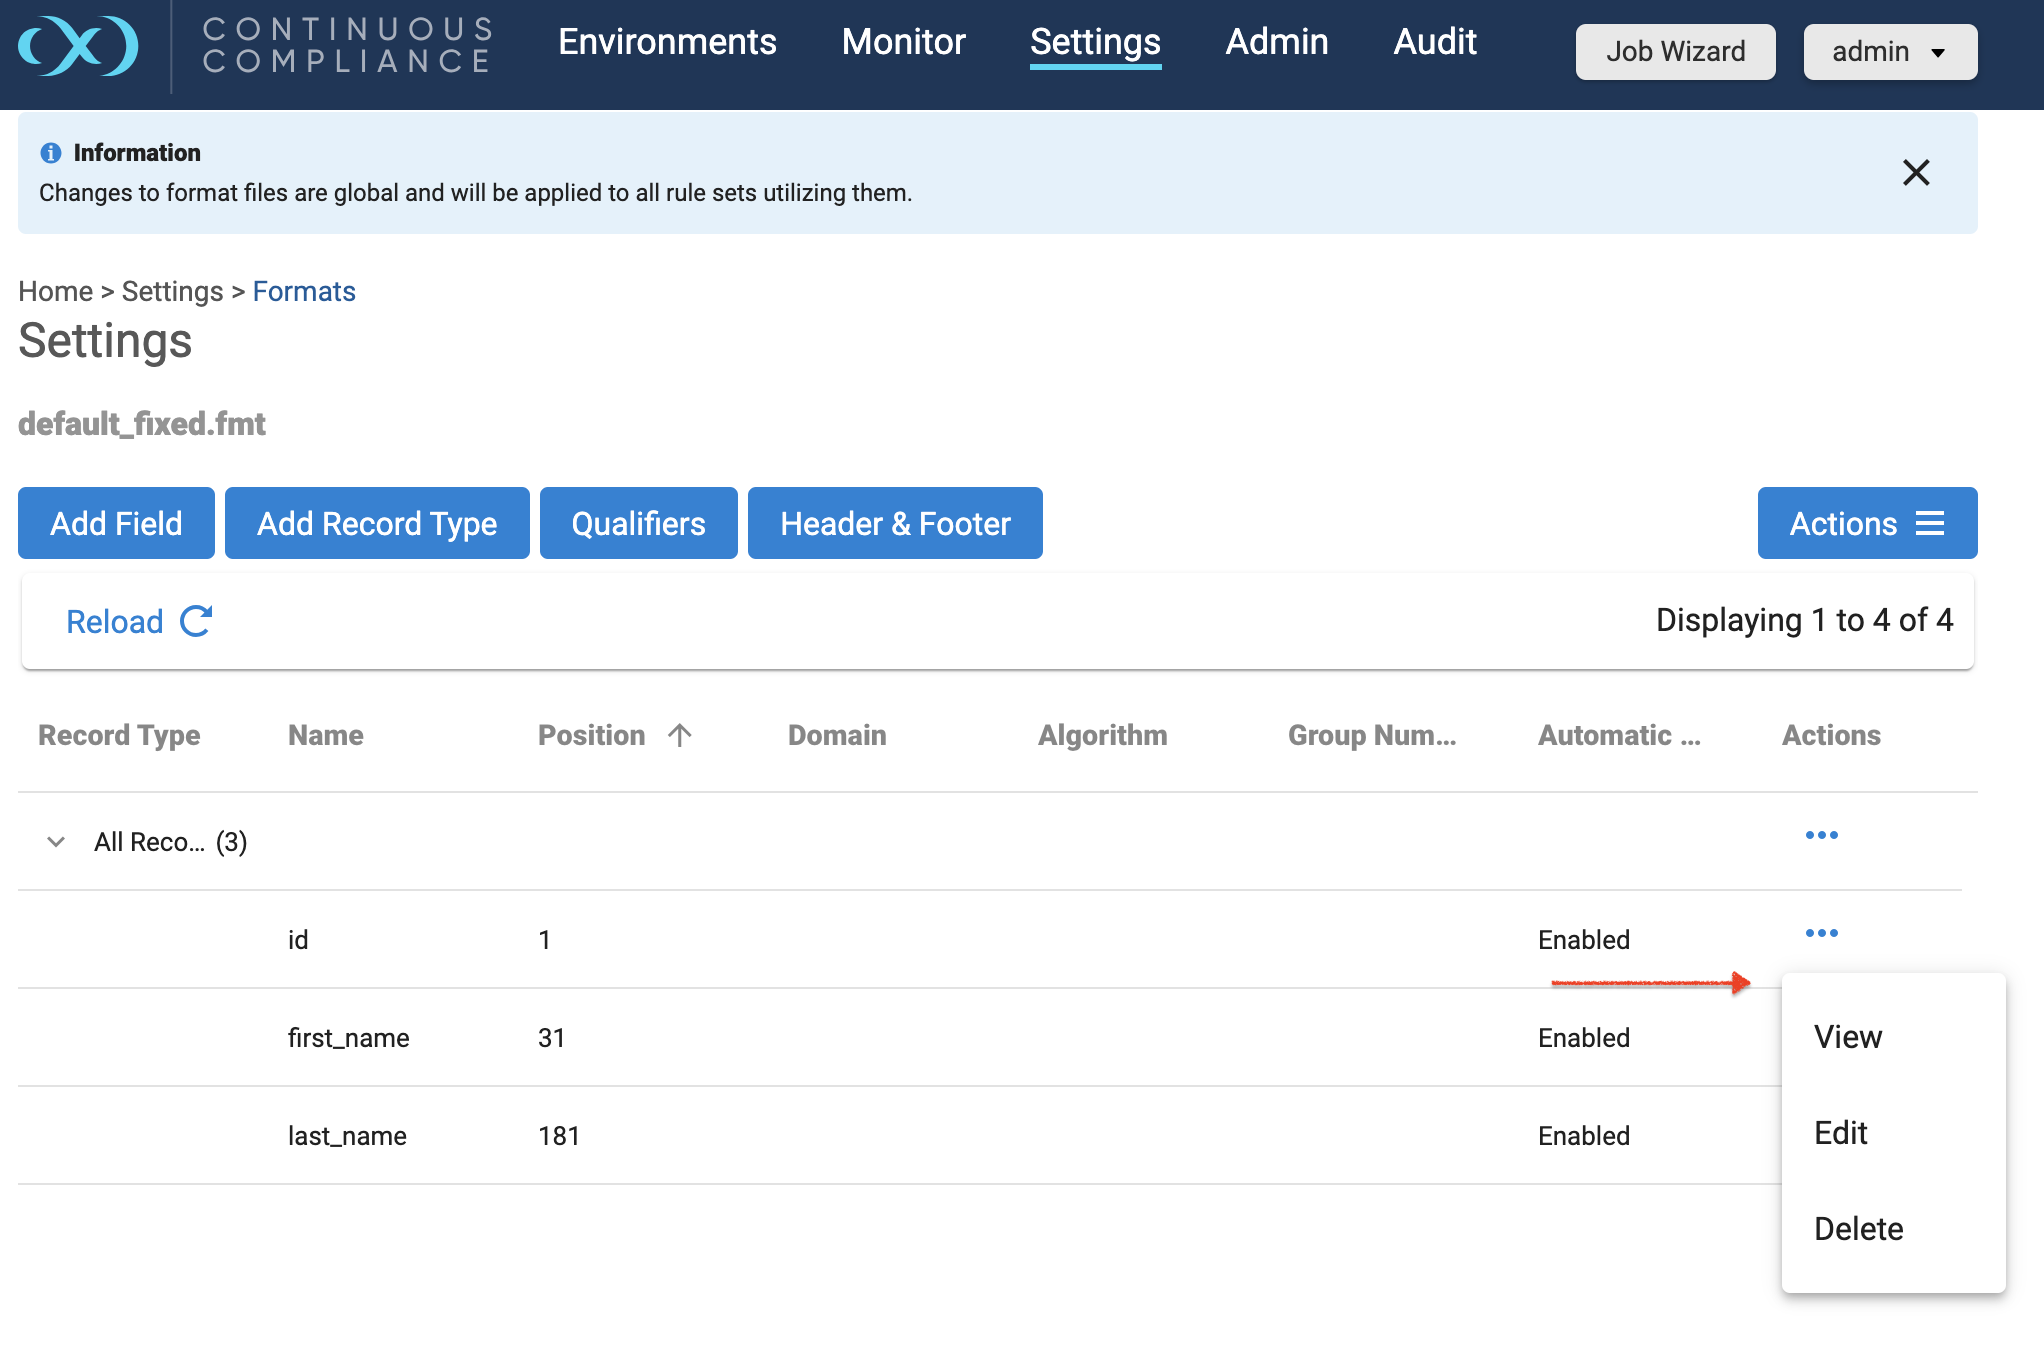
View, Edit, or Delete a file field
The fields can be Viewed, Edited, or Deleted using the Action menu (…) to the right of the corresponding field.
The View is a read-only pre-filled dialogue (similar to Add Fields) and the user can not make edits.
Edit prompts a pre-filled dialogue (similar to Add Fields) and the user can make edits as needed.
Delete action, the user will be prompted for confirmation to Delete a field. Fields from XML and Mainframe formats cannot be deleted.
Edit action for a field can be used from the Inventory screen as well for algorithm assignment and setting up automatic updates only (Masking section only).
Record types
You can use record types to perform conditional masking of the file records. If a file has a different set of records spread across multiple rows, then the masking engine should be able to understand all the unique records. For example, a file has the following record in the first 3 columns of each row; first name, last name, and age – but the last column of each row has a unique record like IP address, ethernet address, etc. In this case, you must create a new record type for every unique record present in the file, and assign a specific file format to all the record types. For more information on adding a record type, see the Managing Record Types article.
Record types can be managed only via the Formats settings, the Inventory screen does not allow adding, updating, and deleting record types.
Redefine conditions
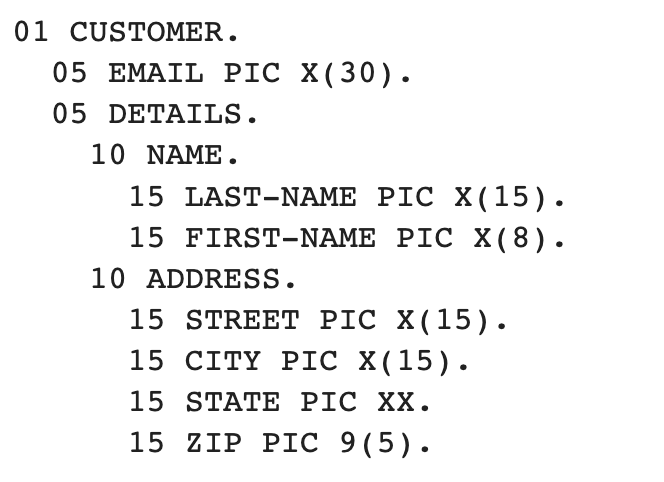
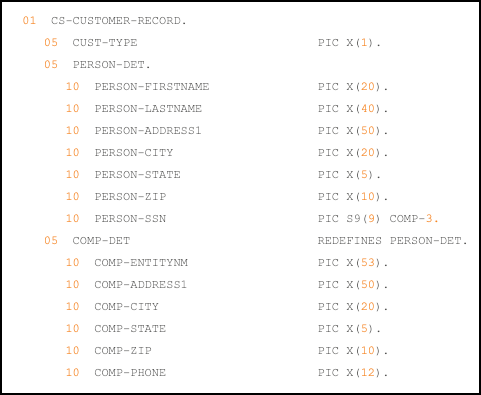
For Mainframe data sets, the File formats screen allows for the entry of Redefine Conditions, which are used to handle any occurrences of COBOL's REDEFINES construct that might appear in the copybook. In COBOL, the REDEFINES keyword allows an area of a record to be interpreted in multiple different ways. In the example below, for instance, each record can hold either the details of a person (PERSON-DET) or the details of a company (COMP-DET).
In order to do any masking, however, the Compliance Engine must be able to determine, for each record, which fields should be read, so that the correct algorithms can be applied. In order to do this, the masking engine uses redefined conditions, which are specified in the format. Redefine Conditions are boolean expressions that can reference any fields in the record when they are evaluated.
In the example copybook above, the field CUST-TYPE is used to indicate which group is present. If CUST-TYPE holds a 'P', a PERSON-DET group is present, and if it holds a 'C', COMP-DET is present. This can be expressed in the inventory by specifying a Redefine Condition with the value [CUST-TYPE]='P'. This expression indicates that, for each record read from the source file during the masking job, the value of the field CUST-TYPE should be read and compared against the string 'P'. If it is equal, the Compliance Engine will read from the record the fields subordinate to PERSON-DET and will apply any masking algorithms specified on those fields. Similarly, a Redefine Condition with the value [CUST-TYPE]='C' should be applied to the COMP-DET field. Exactly one of the conditions should be evaluated to 'true' for each group of redefined fields. For example, a copybook might have fields A, B REDEFINES A, and C REDEFINES A. Of the Redefine Conditions attached to A, B, and C, one and only one should be evaluated to be true for each record.
Entering a Redefine condition
In the File-formats screen, Click the Actions (…) button to the right of the corresponding field having REDEFINED or REDEF type, then select the Edit Redefine Condition option for an edit dialogue to appear.

Enter a condition in the dialog box that appears. This is the expression that when evaluated to true, causes the subordinate fields to be read and (if they have algorithms assigned) masked.
Click Save.

Redefine Conditions can be managed only via the Formats settings, the Inventory screen for Mainframe does not allow adding and updating redefine conditions.
Format of Redefine conditions
Redefine Conditions allow fields to be compared against either number or string literals. Square brackets [ ] enclosing a field name indicate a variable, which takes on the value of the named field:
[Field1] = 'An example String'String literals can be enclosed in either single or double quotes. For fields that are numeric (e.g. PIC S99V9), the operators <, <=, >, and >= can be used in addition to the =operator:
[Field2] <= -10.5Also, conditions can be joined using AND, OR, and NOT to form more complex conditions:
([Field3] > 2.5 AND [Field3] < 10) OR NOT [FIELD4] = 'Z'